Here you will learn how to create a production or location and set up a geofence for that location within Set Connect
Please watch the following video on how to create a GeoFence for GPS sign in’s (2.46):
Read on for step by steps instructions …
Creating Productions/Locations
You can create a new production by going to the Productions tab in the left side menu.
This will show up a list of al your current productions/locations you have registered with your account. You will also able to click Locations and see all Locations underneath that one Production.

To create a new Location, click Add or if you are wanting to add another Location to a Production, click Location for the production you want to add the location to, then click Add up the top of the screen that follows

This will bring up a list of fields to populate.
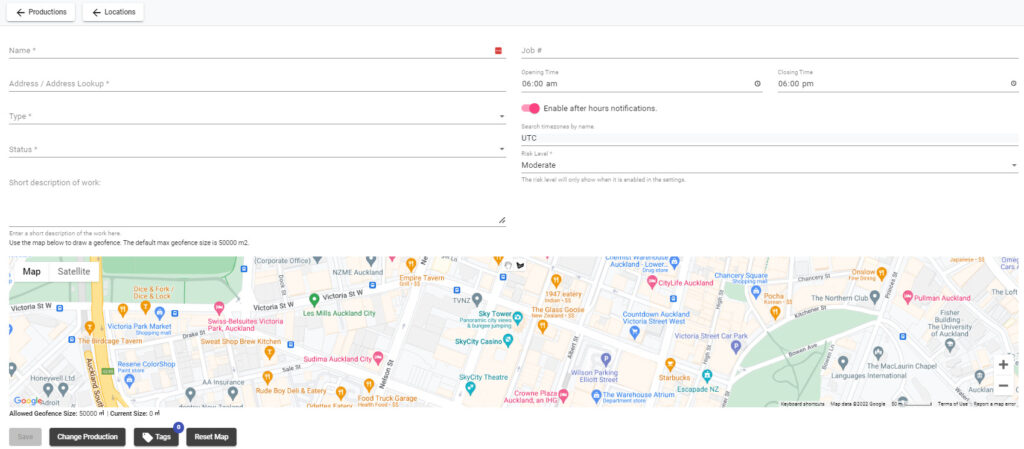
These include:
- Name
- Location/Address Lookup
- Type (Select from drop down)
- Status
- Job Number
- Opening & Closing Times
- Risk Level
- Short Description of Work (Optional)
You can also switch notifications on and off that will be sent to the cast/crew member when they are on location after hours. To switch this on and off click the toggle underneath the opening and closing time entry box
Setting up a GPS GeoFence
To set up a geofence, click on the “draw a shape” tool in the top center of the map at the bottom of the Production./Location editor. This will enable a drawing mode on the map.

The simplest way to draw a geofence is to click on the four corners of the property you want to set the geofence up for. Clicking on the map will plot points for the geofence. Click and do not drag the mouse as dragging will move the map. You are essentially aiming to draw a square on the map which you can adjust afterwards. In order to finish the geofence you will need to click on the first point you plotted to close the loop.
When the “draw a shape” tool disappears from the map, you have successfully set up a geofence. The geofence will have handlers in the form of small circles that you can then click and drag to adjust the geofence.

When drawing geofences, you want to draw them large enough to cater for GPS-drifting. See our GPS-drifting troubleshooting guide for more information around GPS-drifting.
At any time if you made a mistake, you can start again by clicking on the reset map button below the map. This will remove the geofence and/or any plotted points and reenable the drawing tool.

You are only allowed to draw a maximum geofence size of 50000 square meters. If a larger geofence size is needed, you can get in touch with the SiteConnect support team.
You can also toggle between map and satellite modes if you prefer to look at satellite views.

Press the Save button when done. You can also Reset the map if you make a mistake when drawing the GeoFence.
For any more Set Connect issues or questions, please contact us at info@set-connect.com