In this article you will learn how to upload Company documents that will be visible to the Premium Account holder (PCBU)
How to upload a company document
This is a good option to make your employee training documents viewable to the Premium Account Holder (PCBU)
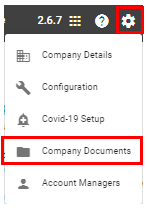
Click on the Cog Wheel in the right-hand corner of the black bar at the top. Then click on Company Documents.

Click on ‘Add Company Document’
This will bring up a dialog box when you can enter the details of the document.
The details you can add are:
- Document name – enter the name of the document, i.e. First Aid certificate
- Document Type- choose from the dropdown selection, i.e. certificate, police vetting, driver’s licence
- Expiry Date- click the calendar icon on the right to select the expiry date. You will receive a notification 28 & 7 days out from the document expiring, on the day of, and 7 & 28 days after the document expires unless it has been updated.
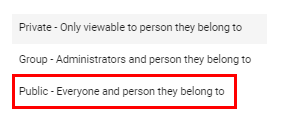
- Document Visibility- select from the drop down. You can select from the below three options for Document Visibility. You will need to select ‘Public‘ to make the document visible to the Premium Account Holder (PCBU).

You can add a document(s) to the Company Document by clicking Add Files. The number of files uploaded will appear in blue next to this box.

Once you have filled in each field and uploaded the document(s), click Save.
How to remove a document(s)
You can remove a document by clicking Remove Files. This can only be done once the document has been Saved.

Click the bin icon next to the right of the file to delete the document.

Then click Yes in the dialog box that appears to delete the file.
How to view, delete or edit an uploaded document
Once the document is saved it will show in your list of Company Documents. You can view the document by clicking on View or delete it by clicking on Delete.
You can also Edit the document by clicking Edit which will bring the Document creation tool back up.

For any SetConnect issues or questions please contact us at: info@set-connect.com